
So here is the process: (Sorry I have no photos, I did this a few years ago. Please bear with my "Paint" examples)
I told myself if I found some gray paint on mark down I would take it as a sign that I should paint his room. Well, I did find some at Walmart, so I jumped on it and started my project.
The first thing I did was make 2 other shades of gray. One lighter then the base, and one darker. I shaded the lighter one with excess white semi gloss I had in the garage, and the darker color I added some black tole paint from my craft closet. (it didn't take much, I didn't want it too much darker, the wall was already gray)
I painted the entire wall the color of the mortar. I then cut out a cardboard "brick" and traced it on the wall, starting at the baseboard. Be sure to stagger the bricks, and don't always start with a solid brick in the corner. I used white chalkboard chalk to trace my "bricks". To make my model brick I used a piece of cardboard. (see diagram below)

Once I had the entire wall traced on, I took my darker color and painted a "L" down the left side of the brick and across the bottom. I then painted a light "7" across the top of the brick and down the right side. Here is an example I created on Paint:
 In the next step, you take a crumbled up plastic grocery sack and "stamp" the wet light paint onto the dark paint. Repeat this back and forth. Stamping bottom left to top right, top right to bottom left. Fill in the middle with your "stamps". Here is another lovely Paint example:
 *Be sure to turn the plastic bag inside out. You wouldn't want "Walmart" stamped in blue ink on your wall"
Repeat this trick over the whole wall. I did a few bricks at a time, but remember that once the accent paint dries, you can not "stamp" it anymore and you will be left with a light and dark line on your brick.
To finish it off, any stamps that got out of control can be painted over using the original gray in the mortar lines.
So, finally.....here is my sons arched window:
 This is the arc window that started it all.
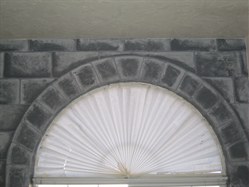 Close up of the arc
 This was before I decided to do the 2nd wall
 Above is the final project as of a few years ago.


My boys are fighting over who gets this room when we take the younger 2 out of bunk beds and move my oldest downstairs. :)
You could do this in pink or purple for a girl, add windows with a country seen painted on the wall, or even make the top of the wall, the top of the castle with open bricks. I wanted just a solid wall. I was worried that it would darken the room too much if I did all 4 walls, so the double door closet wall, and the wall with the door I left white. (White under the huge LOTR and Aragorn posters) With this huge window we don't have a problem with the room being too dark. :)
I'm still on the look out for a Medieval Tapestry to hang in there, but they are EXPENSIVE!! I've thought about sewing my own "Coat of Arms" for the room....I'm afraid it will look cheesy so I haven't done it yet.
So.....what do you think?

love it!
ReplyDeleteAwesome!!
ReplyDeleteThanks! It was a lot of fun to do.
ReplyDeleteWow! Looks great. I'm sure that was a lot of work! I hope your son is enjoying his room.
ReplyDeleteVery nice. My daughter had a "castle" under her stairs. She bought a stencil about 12-14" high of a W - her last name initial, stenciled it on the wall and then painted a flag of sorts around it. You know, the ones that hang from the trumpet to announce the guests to the castle? I can see you printing this on burlap!
ReplyDeleteWow, nice job. The bricks look so real. He must totally love it!!
ReplyDeleteTHAT is amazing. God, I'd love to hire you for my mural business! You don't happen to be in Chicago???
ReplyDeleteGreat work.
Thanks for linking up and your fix of Creative Juice this week...
I love it! And you make it look so easy. I love the look, but have been reluctant to try it. Maybe after seeing your instructions I just might.
ReplyDeleteFYI: Creative Juice is on hiatus until the week of Valentine's Day because of The Beat the Winter Blues Party.
ReplyDeleteIf you have any cool photo project you'd like to link up...stop by!
http://momnivoresdilemma.blogspot.com/2011/02/beat-winter-blues-tackle-those.html
Thanks so much for posting this! I'm about to do something similar for my eight year old. This is exactly what I was looking for!
ReplyDelete-Crissy Sharp
Love the technique! How did the chalk work to make the mortar lines?
ReplyDeleteLove the technique! How did the chalk work to make the mortar lines?
ReplyDeleteThe chalk lines worked pretty good. They were easy to erase and gave me a straight line that I could just paint over.
ReplyDeleteFor the tapestry for the walls I made my own. I went to joanns fabric bought some upholstery fabric, light curtain backing (to hide thee seams) and some cording (with cord edging so I didn't have to hand sew the cording) I made my own tapersty at a fraction of what it would cost to buy one. They look great in my sons room
ReplyDeleteI'd love to see pics of your tapestries! Thanks for the idea of the upholstery fabric, great idea!
ReplyDeleteI plan to make my daughter a castle bed we found online and paint it using your method. The original plan we found used wood and cut out a tapestry like thing to hang over the entrance of the "castle". I plan to sew our family coat of arms. My oldest had to do one as a class project and it was way easier than we thought.
ReplyDeletePrint out your family coat of arms and enlarge it to the size you want (plus a regular sized one as a guideline). Trace over the lines with black marker and then cut out each individual section. Pin to fabric and cut. Use iron on fabric adhesive. Iron together on the large back fabric. Then go back and zigzag around each of the "seams". Presto! You have your very own family coats of arms!!