Showing posts with label Craft. Show all posts

Monday, September 7, 2015

DIY Halloween Yard Witch


I found this project on Martha Stewart's webpage a few years ago. It was a little time consuming, but the results were worth it! :)

I started with a trip to Home Depot for supplies:

1 panel of plywood ( I used 1/2 inch because I didn't want it to be really heavy it was $11.00 a sheet)
Pipe clamps (same size as the PVC pipe, 1/2 inch)
PVC pipe (big enough to fit your re-bar snug(1/2 inch))
Re-bar (4, 2 foot pieces and 2, 4 foot pieces. I used thicker pieces for the witch)
6 cans of black high gloss spray paint OR High Gloss outdoor latex paint and equipment needed
1 box of 1/2 inch screws
My total was around $25.

I could not get the overhead projector like I had planned, so I printed the template out on the back of some scrap paper I had. The template was easy to layout in grid form. I attached them with a little adhesive glue spray. **I learned after doing the witch, it's easier to tape them together with scotch tape AND use a generous amount of adhesive spray. When the jigsaw gets turned on there is an exhaust that blows the papers around.**


I then took my jigsaw and started cutting out my witch.

I've taken a few close up photos of how to cut the tricky angles. You have to cut into the angles like you would cut a slice of pie. (think triangle) Cut along one side then start on the outside again and cut along the other side. You can't make a sharp turn with a jigsaw blade, if you try you will bend or break your blade.


**Also take note of when the piece you are cutting is too heavy and pulling on your project. Example is when you cut the Witch's dress. I started at the bottom and by the time I hit her waist that scrap I was cutting off was going to be really heavy and might break where I didn't want it to. So I thought ahead and made a cut from the outside toward the waist. So when I got to that point it was already a clean cut with no breaking. (Think of scoring a paper before trying to tear it)

I got the 2 arched cats and 1 witch out of my one sheet. I think I could have fit the sitting cat, but I didn't like it as much as the other 2. **I also drew a lantern and cut it out. The Martha Stewart display has a real decorative lantern, but I was too cheap. :)In order to "cut out" the middle of the lantern, you have to start with a large
drill bit. Drill a hole and then insert the jigsaw blade and start cutting. At first
it's a lot of "chunks" because there isn't much room to move around, then you
can start cutting out the larger spaces.

I used some multi-surface sealant I had to seal the wood before I painted it. I did this because I wanted to use them for the next few years and I didn't want the wood to swell when it got wet.

*I'm on the fence on this process. I sealed it, then painted it. It was a little hard to get the paint to adhere to the wood after it was sealed. HOWEVER, if I had painted it before, and then seal it the wood would have soaked up all my paint. It ended up working fine sealing it first, so I think I would do it that way again now that I know it will turn out. It was frustrating for a while though.


Painting the witch and 2 cats took me 6 cans of cheap Walmart Spray Paint (.97 each). That's 2 coats on each piece. Now, if I had to do this over again.......I MIGHT splurge on a can of Color Place black Latex outdoor paint. The coverage would be better. I think a can costs about $11. I paid less then $6 for the spray paint. I'm on the fence on this one too as to whether it would be worth it to purchase the can of paint. But then you have to mess with rollers and trays and excess paint to store, but it would be faster and your finger will not hurt afterwards......I'll leave that up to you. ;)

Here is my own invention on the stand. First I spray painted the PVC pipes black.

I secured them onto the board with the pipe clamps.


Now when I want to place them, I hammer in the re-bar poles into the ground and slide the PVC pipes over the poles. This seemed to me to be the easiest way to store them without poles sticking out of the bottom of them.

And HERE is the final result!
I'm excited to see what the back light looks like on them. This might not be their "final destination" we'll see. Now I just need to add a broom, although I might wait till after Halloween and pick one up cheap. :)

linking up at Tip Junkie
Pin It!

Friday, February 8, 2013

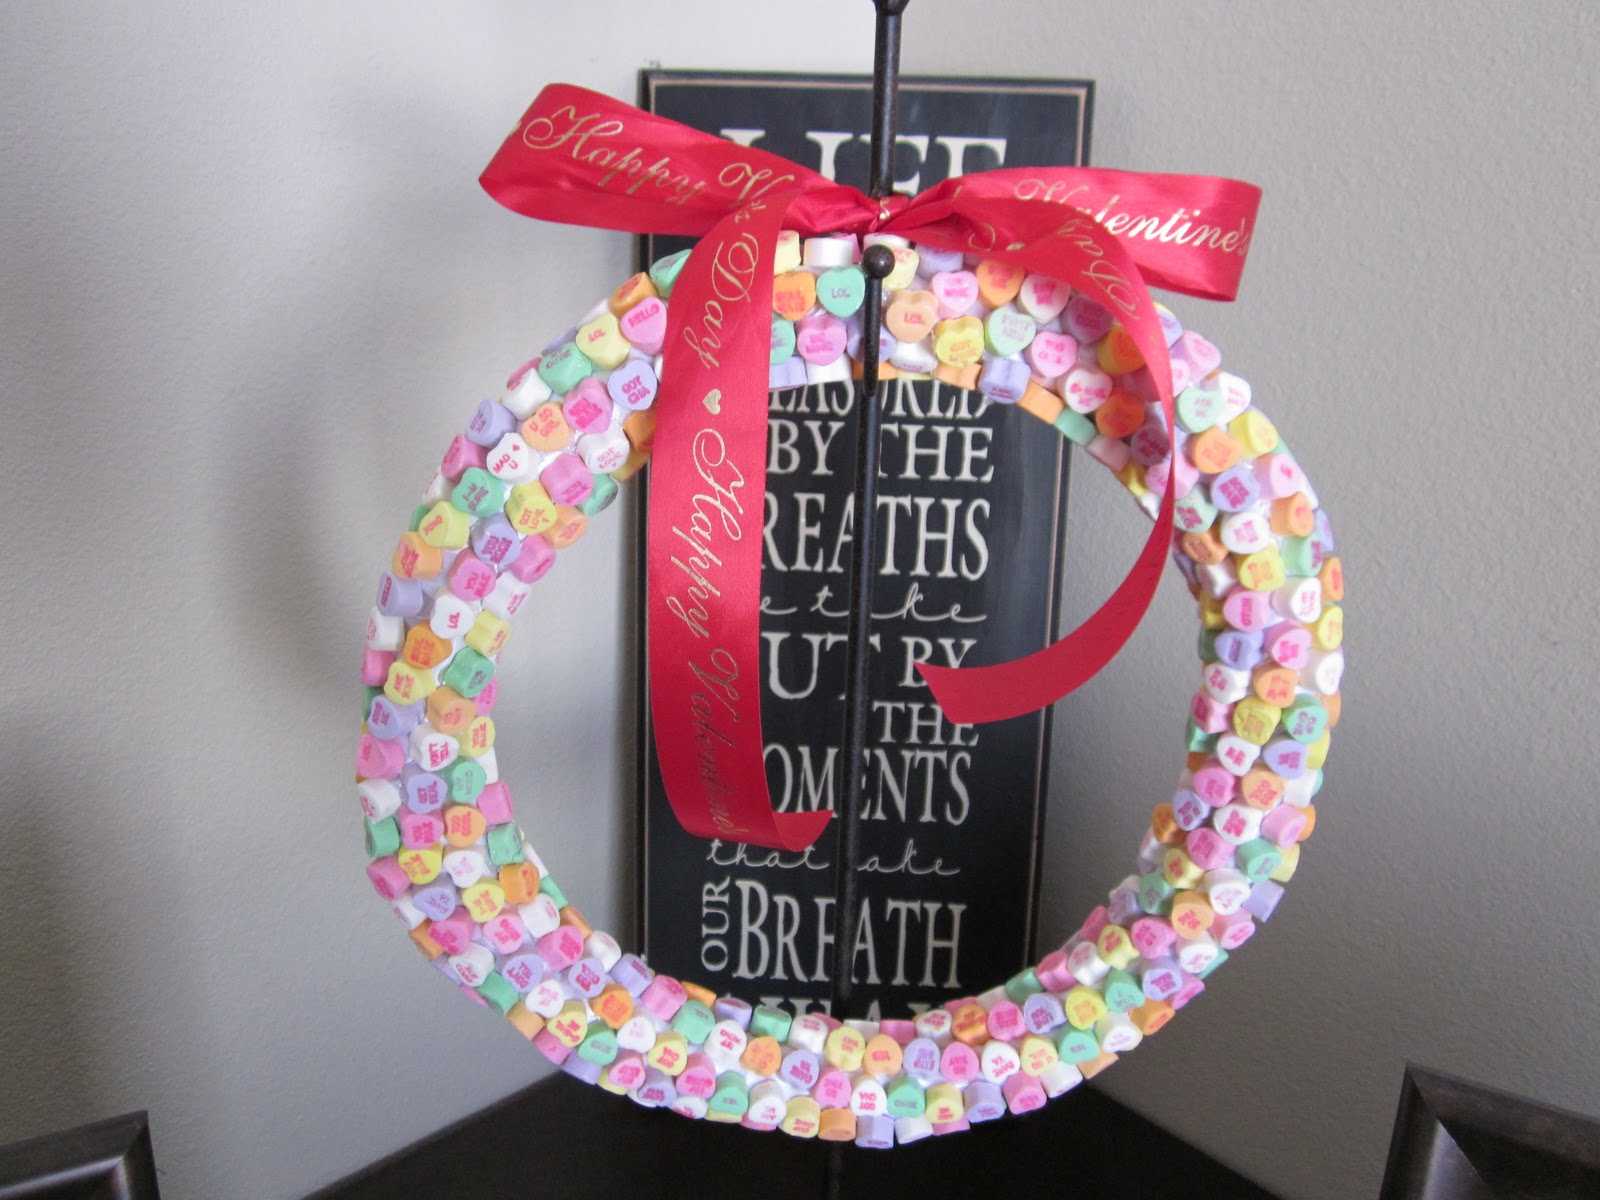
Valentines Candy Wreath

It's almost Valentines again, so I thought I'd re-post my Valentines candy wreath! :)

I went to Dollar Tree today and purchased things I needed to make a Valentines Wreath.  Here are my supplies:
1 Wreath. (I was looking for a Styrofoam one, but she said they sold out at Christmas.  I wasn't going to pay for one at a craft store knowing they are only $1 at Dollar Tree!)
1 (4) yard roll of Satin Ribbon (I purchased 2, but only used 1)
3 bags of small conversation hearts (I purchased 5 and only used 3)
2 (at least) BIG sticks of hot glue
Hot glue gun
Begin by wrapping your wreath with the ribbon.  I did this so any area that isn't covered with hearts looks nice and finished. (also because my wreath was wicker, but I would do this if I found Styrofoam too)  I glued down the end, then wrapped it like a candy cane all the way around and glued the other end down.
 Decide your pattern and start gluing! I thought about doing a color cordinated one, but each bag has different amounts of the colors in them.  That equaled too much time for me and when it's random people can't tell if you messed up anywhere! :)  I did glue them in a diagonal pattern (see below).  As for colors, I just made sure no 2 colors were together.
glue........heart..........repeat......glue.....heart.......repeat......glue.........heart.......repeat....
Ta-Dah!!!  I think it turned out so cute!
Here's a close up so you can see the pattern:


Wreath $1
Candy Hearts: $3 (3 packages)
White Ribbon: $1
Glue sticks and ribbon were already in my supplies so they were free! :)

Thrifty Total: $5.00
Visit thecsiproject.com
Pin It!

Friday, February 3, 2012

My Memories Digital Software $10 discount

We have a winner! Random.org chose our winner....#9.....lrbwil@_! Congrats! Check your inbox for a message from livingthrifty101@gmail.com.

If you weren't a winner, don't worry, you can still score $10 off the My Memories Digital Scrapbook Software (which comes with an extra $10 coupon for the MyMemories.com website!)
  1. $10 off the purchase of My Digital Scrapbooking Software! Included with every Software purchase is a $10 coupon off MyMemories.com website!
  2. Use promo code STMMMS92413 to get the $10 savings.
Pin It!

Tuesday, December 13, 2011

Christmas Terracotta Soldier

Photobucket
My Grandma made me this when I first got married.  He's my favorite Christmas decoration. My kids know they go no where near my soldier. ;) I thought I'd show you a few photos so you can see how thrifty this little Terracotta Soldier is.

He is made of 5 Terracotta pots.  The orange kind you can find at any store during the summer.  You can use any size.  Mine has big pots so he stands about 2 feet tall.
  • 2 are black, 
  • one is blue, 
  • one is red
  • one is peach on the front and black on the back (where his hair is)
Photobucket
She painted every pot and let it dry.  She used Quarters to trace the size of his cheeks.  His eyes are half a quarter for the black and half a quarter plus a little for the whites. His nose is 1/2 a nickel.  She had a pattern for his face, but that was 14 years ago so who knows where it is now. (truth be told she could probably tell me right where it is at her house if I asked.) ;)
 Photobucket
She attached the pots open ends together with a TON of hot glue.  He hasn't fallen apart yet! :)  Then she added ribbon, felt arms, and a few little accents.

I've made a few of these with the little pots and they turned out so cute!
Pin It!

Monday, November 7, 2011

40% off Hobby Lobby printable coupon

 Tis the Season! :)

Click HERE to print your Hobby Lobby valid through 11/12

I also hear you can pull this coupon up on your phone and still get the discount.
Pin It!

Wednesday, June 8, 2011

Umbrella Makeover

A fellow Thrifty 101 reader Heather sent me this awesome project.  Here's what she has to say:

......with all this rain that has come and maybe gone, I thought it would be fun to show you my latest umbrella makeover...

First of all the story of the umbrella.  My sisters and mom thought I was absolutely nuts when I bought this awesome umbrella when we were in Italy last February only to rip it apart before we got home.  After all, it wouldn't fit in my suitcase anyway.  It cost me 5 Euro which is about $8 bucks in US dollars.  I figured if my plan for it didn't work, I wasn't out too much.  So, I attached the before shot and makeover pic for you to see. 
 Kind of fun huh?  The best part is that if ever I am stuck in a rain storm with my kids while wearing it.  I can just shove them under my skirt while we walk and they will stay nice and dry.  Genius!

How fun is that skirt?!  I would have never thought of making a skirt from an umbrella.  Way cute.
Thanks to Heather for sharing her creative genius with us all!

Be sure to check back later tonight when I will have the DIY Thrifty Thursday link party up and running!
Pin It!

Wednesday, March 16, 2011

Roberts Craft 50% off


Roberts craft has a 50% off one item coupon out.  Click HERE to be linked to it.

Valid through Saturday March 19.  Normal restrictions on Cricut, gift cards, class registration....etc.

On a side note, does anyone have an opinion on Cricut Expressions vs. Sihlouettes SD?  I'm thinking of purchasing one for personal use for paper and vinyl but I've heard pros and cons of both.
Pin It!

Tuesday, February 1, 2011

Thrifty Valentine's Door Decor

This Thrifty Valentines door decor was really easy to make.  Here are the supplies I used:

1-2 pieces of Fencing Slats depending on size.  You could do this with 1 slat.
Metal wire
thin piece of scrap board to make the white heart
craft supply fake moss
twine for the bow
paint
hot glue
Jig saw (or some kind of saw)
Drill
  1. Trace two 1/2  hearts on your fence slat.
  2. Trace a piece that will be your sign
  3. Cut out your wood pieces
  4. Paint all your pieces and title your sign.
  5. Drill holes in the heart pieces so you can tie them together on the back side with the metal wire. (I tied mine in 3 places)
  6. Drill holes in the top of your heart and the bottom of your sign.
  7. Hot glue the moss on the red heart 
  8. Place the white heart on the moss and drill two holes about an inch apart (like button holes).  This time insert the wire from behind and curl the excess for decoration on the front side.
Pin It!

Friday, November 5, 2010

Wedding Cake flowers

As I stated in my last post, I made my sisters wedding cake for her reception today. And with that, I actually got to make the flowers to go along with it! I've done wedding cake flowers before (See the top left of Thrifty101 home page for a link to Michelle's Cake Creations.) I've done silk flowers and real flowers, but this time I took pictures of the process.

To start off you will need:
  • Flowers and greenery. Choose large bloom and smaller "filler" flowers
  • Styrofoam balls cut in half (1/2 for each tier)
  • Wire cutters or wire cutting pliers
  • Something the diameter of the cakes so you can decide how big the flowers need to be. Since I made the cake, I just used the cake pans.
To start off, cut all the flowers off of the bunch stem.Start with the large flowers, and spread them out evenly around the Styrofoam 1/2 ball. All you do is push the wire stem into the Styrofoam. As you can see in the diagram below, my largest blooms were red and yellow roses. *In order to do this, you will need to trim down the stems with your wire cutters. They will need to be 2" or so depending on your final shape of the piece.

I got a little caught up in the "creative process" and forgot to take photos of this part. (sorry)

If you compare the drawing on the left to the final piece on the right, you can see red in the middle and at about 12, 5 and 7 o'clock. You can also see yellow at about 10, 2 and 6 o'clock


The next step is to take your smaller "filler flowers" and greenery and fill in any empty spaces. My fillers were the purple flowers and the greenery. *Silk flowers often come with greenery on them. Do not discard this greenery, you can use it as a filler!


I think they flowers turned out great! Here is the final pieces:
Bottom Tier
Middle Tier
Top tier

You can see I used a beach towel and sat on the floor to do this project. The whole process took me about 2 hours to complete. I'll post the cake in it's entirety on Michelle's Cake Creations page this weekend, so take a look over there!  Here is a taste of the final cake:
Pin It!

Wednesday, October 13, 2010

New Halloween Projects


I found this on Martha Stewart's website and have decided this is my new project for this weekend. Stay tuned for the revile!

I also saw some SUPER CUTE Halloween goodies on a local morning show (Good Things Utah) that I wanted to share, CLICK HERE to see them.

And THESE little monster cupcakes are adorable. from Sugar Daisy Bakery.
Pin It!